I made a set of snoots and grids for my 580 EX II out of a length of vinyl gutter downspout. The downspout dimension is listed as 2" x 3" but is actually a little bigger. Nonetheless, the plastic connectors for the downspouts are a pretty good fit for the 580 EX II.

I wanted some flexibility with the set of snoots and grids. With a couple of snoots of varying lengths and a couple of grids with different baffle lengths I should have a lot of options in controlling the spread and quality of the light. I chose to make the snoots 7" and 4". The lengths of the baffles (black plastic straws) in the grids are 2" and 1". The set allows each of the components to be used individually and in combination. This results in a kit with a total of 8 possible configurations!
Here's the list of materials:
1 - 10' Length of White Vinyl 2" x 3" Gutter DownspoutSupplies and Tools:
2 - White Plastic Downspout Connectors
Black Plastic Drinking Straws
Flat Black Spray Paint (I had great luck with Krylon's Fusion for Plastic)
1 - Thin foam can coozy
Hacksaw (for cutting Downspout)The first step is to cut the downspout into the desired lengths. I cut four lengths: 2" and 3" for the grids and 4" and 7" for the snoots.
Paint Thinner (suggested prep for the spray paint)
Duco Cement (for gluing the straws)
Hot Melt Glue Gun and Glue Sticks
Scissors
Marker
Medium Grit Sandpaper (I used a sanding sponge)
Masking Tape (get the good, blue kind)

I found it difficult (even using a hacksaw) to make straight cuts. This means the ends of my snoots are not square and look a little ragged. If I used a miter box I probably would have had better results. After cutting the pieces, I sanded the ends. I wiped down the pieces with paint thinner as suggested by the directions on the spray paint can.
I was concerned that since the pieces fit very snugly into the connectors, a layer or two of paint would make the fit impossible. Top prevent needing to fit together two painted surfaces I masked off one of the surfaces. For the snoots and grids, I used 1" masking tape to mask the INSIDE of one of the ends of the cut downspout. I took one of the connectors, and masked off the OUTSIDE of the smaller end and the INSIDE of the larger end (this will be used to connect a snoot to a grid). On the other connector, I masked off only the OUTSIDE of the smaller end. This will be used to connect a snoot or grid to the strobe.
I sprayed all 6 pieces inside and out with the flat black paint. Two light coats worked well and gave good coverage. Drying time between coats was about 30 minutes or so. After the paint dried for a couple hours, I removed the masking tape.
The next step was to build the grids. I cut the black drinking straws into the desired lengths. I used 2" pieces for the 3" grid assembly and 1" pieces for the 2" assembly. You can use whatever lengths you'd like, but be sure to leave 1" for the connector to fit inside the grid assembly.
I used the Duco cement to glue the drinking straw pieces into the grid assembly. This cement is clear and fast drying.
The only thing left is fitting the flash connector to the flash head. I cut the coozy so I had a long strip about 1" wide. The Duco cement worked well to cement the coozy material into the inside of the flash connector. This layer of material provided a snug fit on the sides of the flash, but there was still some wiggle room on the top and bottom. To fill in this gap I cut additional 1" wide strips of coozy material and used the Duco cement to glue them to the first layer of material. The Duco cement didn't hold so I tried the hot glue gun. The hot glue did hold the second layer to the first. For the 580 EX II, the two layers work fine. The head of my LP 120 is slightly smaller and I think I'll make another connector with additional padding.
Here's a shot of the entire kit:
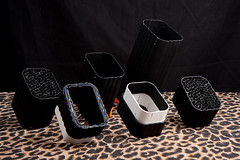
Back Row (l to r):
- 2" Grid
- 4" Snoot
- 7" Snoot
- Flash Connector (note the coozy padding)
- Snoot / Grid Connector
- 1" Grid
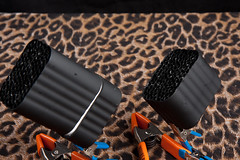
Here's a closeup of the Grids. Note that the 2" Grid is mounted on the Snoot/Grid Connector.
Snoot with Grid Attached:
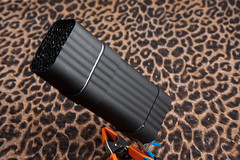
This shows how Grids can be piggybacked on a Snoot. This shot shows the 1" Grid connected to the 4" Snoot using the Snoot/Grid Connector. The Snoot is also attached to the Flash Connector.

No comments:
Post a Comment